Thursday 18 April 2019

Toilet learning 20 months old

Potty trained at 20 months old??

One of the first reactions I received was: "Pity her!"

I do not blame anyone who thought so because I would think the same IF I did not know about Montessori philosophy and method. Some might think I 'force' my child to do something beyond her capability. 

Fret not, it was a natural, respectful and gentle way. However, bear in mind, this is not for those who look for potty train in few days. Mine took few weeks. 


What made me start teaching K to use toilet? 

💚Time - Time was on my side. There were currently no major changes in our life (e.g. new baby, overseas travel) and I also have plenty of time now (I'll be starting work soon). 

💚Support & knowledge - To be able to be patient and prepared, one needs to understand how things work. So, you become more confident. I tried to read on Montessori toilet learning - they frequently use that term instead of potty training. One of the books I read was 'Stress-Free Potty Training' which I borrowed from National Library. The books personalize approach according to the kid's personality. I will explain later. I mixed the tips from those readings to make up my own approach towards little K. 

💚Signs of readiness - The key factor; Kawthar! It was through my observation on her that made me more confident. 


1) She told me everytime she wanted to poop (body awareness)

2) She learnt to squat when pooping
3) She loved taking off her diapers and walked diaper-less 😂 

However, some kids may have different signs. 


First steps 

💧Know your child's personality 


- Is she sensitive to changes? Does she love achievements? There are 5 types of personality that are listed; Goal-directed, Sensory-directed, Internalizer, Impulsive and Strong-Willed. I did the questionnaire and found out Kawthar has moderate characters of goal-directed and internalizer. It was good to find out her personality through the test but if you don't read the book, its still ok..you can still try to read your child. 


In my case, I noticed that Kawthar is quite sensitive if I push her (Internalizer). She would say No to everything and give opposite reaction. This is why some famous tips like asking/inviting K to sit on toilet every 15 mins - did not work with K! Same goes with giving her lots of drinks (not a normal routine). She felt pressures from it. I invited her every 3-4 hours only. Example of sensory-directed child is kids who are bothered by label tags on their clothes. So, they might be particular and bothered when sitting on the potty/toilet seat. You can let her practice sitting on it many times before acting further. Sitting is also part of learning, worry not!


💧Right equipments 


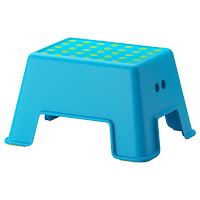
- I bought 2 types; IKEA Lilla potty and IKEA Tossig Toilet seat. Tossig must be used with a stool and I chose IKEA Bolmen stool as it has a suitable height and is waterproof. At first, I thought Tossig was rather high for K to reach and Lilla would be a good option as its on the floor. But it turned out that K looked at Lilla more as a toy rather than a potty so she never pee/poop on it. Maybe it was due to its bright colour and lightweight. 


LILLA
TOSSIG
BOLMEN


Having right equipments would make the child feel belong and confident to use. Right size and right height. Tossig has small size of hole so K could sit rather comfortably compared to sitting directly on the regular toilet while Bolmen is sturdy, anti-slip (not moving at all) when Kawthar climbed on it. This setting allowed her to do things independently - climb and sit on her own or with minimal help from mommy. 


💧Physically and emotionally prepared parents


- Wajib! Keep positive mind throughout the process. Be extra patient. More calm. Montessori is about gentle parenting. You cannot scold a toddler who is learning a new skill and undergoing a major change in her routine. Accidents SHOULD happen and must be EXPECTED. Because through accidents, lessons are learnt. Do not make them feel guilty of mistakes.


Toilet learning is a natural process just like learning other skills like walking. We cannot scold a toddler who's falling when learning to walk.. Despite that, its undoubtedly very tiring for parents to monitor closely. Honestly speaking, I felt like giving up few times Haha. 

So how did I prepare myself?

1) I told my husband about my plan and made it a point that WE are in this together. Alhamdulillah he was supportive and helpful. 

2) Free up schedule. Less time for cooking and house chores for the 1st two weeks. It was either a simple meal or lunch box (I know my energy limit!). Most of the times, I watched K like a hawk's eyes, did cleaning and brought her to toilet.

3) Prepare a cleaning caddy for accidents use. Less panic! The caddy contains 3 washcloths, water spray, anti-bacterial spray and small pail.

4) No carpets and any absorbing fabrics on the floor.

5) Trial 😆 Before I actually started, I tried to practice the emergency (read:accident) drill and improved what was lacking.


K's timeline

Late  19mo: Trial
Early 20mo: Started toilet learning
Early 21mo: Diaper-free during the day (except sleeptime)
Mid   21mo: Currently learning to diaper-free at night and travel

DO remember that every child has different pace and own timeline. What works for K may not work for your child.

That's all for now. InsyaAllah will share more on this topic in next post.

Till then,
xxx

Thursday 27 December 2018

Toddler's dressing area Montessori style

Ever since I had a look at Montessori, I have tried to set up spaces at home according to its principles. I find it compatible with my little family. This time around, its Kawthar's dressing area! At the age of 18 months old, she enjoys having her ways of doing things. 

"Let me do it myself!"

Dressing corner
I arranged it in the way that can help Kawthar dress herself up. That means the wardrobe is open, low and has easily pulled drawers. Small laundry basket that suits her height, changing mat on the floor that she can easily sit on are the arrangements I chose. 

First wardrobe, Second wardrobe, Diapers shelf
The first wardrobe is where I put all her clothes, bed sheets, towels and accessories. Its closed and for me to use. The second wardrobe is the one that Kawthar uses everyday. I would hang around 4 dresses (baju jalan) and put 2 daily clothes (baju rumah) and 2 pyjamas (baju tidur) in the drawers. Limited number of clothes allows her to choose easily. I don't think she understands now that she is making a choice but she'll get there. Maybe when she gets older, I'll put more choices. 


Easily opened lid for the first drawer

2 sets of clothing for each drawer
I reorganized this area for 2 months+ and I noticed that this arrangement allowed her to do things more independently. For example, putting dirty clothes into the laundry basket, picking her diaper, choosing her clothes of the day. She does this most of the times except when she's not in the mood. But that's totally fine. She does make a mess like taking out clothes from the laundry basket and drawers but not too often. Once a week is manageable on my part. 


Small basket for her. Big basket for extra dirty clothes.
Although there are two baskets, she only put her dirty clothes in the small one as I first showed her. She always ensures the clothes are properly put (no dangling on the edge). Guys, kids mimic! 😅

Here where I got all the items from: 
  • Wardrobe 1: I actually found it on an online shop but I forgot the name. Its a shop based in Ipoh, Perak. I still have the number because I once contacted him through Whatsapp 012-5814580
  • Wardrobe 2: IKEA Trofast series (including drawers, lid) - I hacked it
  • Adjustable tension rod: SHOPEE
  • Diaper shelf: MOTHERCARE
  • Big and small laundry basket: KAISON
  • Hanging storage: IKEA Fabler Anka
Sometimes you can just use what's available in the house to set up the space. As for me, I just added the second wardrobe. The rest is already in the house (some are gifts). See what works for you! Hope this helps.

xxx
MommyBel 

Saturday 15 December 2018

New Zealand: Baby-friendly itinerary & budget

We are a family of 3 with a toddler. When I planned the itinerary and budget initially, I googled and read others' travelog and customized it to our need. 


Wanaka Lavendar Farm
So, why I defined it as baby-friendly? 
  • Less packed schedule. Kami tak target untuk kejar banyak tempat dan aktiviti dalam 9 hari. NZ is a big country and going from one place to another takes so much time and energy.
  • En suite room or room with private toilet
  • Non extreme activities
This is suggested itinerary. We didn't get to cover everything that we plan but I hope it can give you a rough idea of how it is. We spent 2 days in North Island, 7 days in South Island. Tempat paling cantik pastinya South Island. 

FULL ITINERARY

1st day 
- Depart from KLIA2 at 11pm, transit at Goldcoast

2nd day 
- Arrive at Auckland airport at 5pm
- Pick up car
- Buy simcard at The Warehouse & grocery shopping at New World (near airport)
- Dinner/Takeaway @ Grill & Shakes 
- Light sightseeing around Auckland
- Check in AirBnb

3rd day
- Cook for breakfast
- Check out AirBnb 
- Drop off car
- Depart to Christchurch at 11am
- Arrive at Christchurch at 12pm, pick up car
- Check in AirBnb, cook, eat
- Visit Botanical garden or Orana Wildlife Park
- Shopping & sightseeing around Christchurch
- Takeaway 
- Rest

4th day
- Check out AirBnb
- Grocery shopping 
- Visit Lake Tekapo, Church of Good Shepherd
- Arrive in Mount Cook, check in Alpine Mt Cook lodge
- Enjoy the view around Mount Cook
- Star gazing in front of lodge
- Cook, sleep

5th day
- Check out Mt Cook lodge
- Breakfast at Hooker Valley, trek a little bit only
- Visit Lake Pukaki
- Lunch at High Country Salmon, Twizel and feed Salmon
- Depart to Wanaka
- Check in AirBnb
- Walk along Wanaka Lake, "That Wanaka Tree"
- Take away dinner at Erik's Fish and Chips
- Sightseeing + flexible activity
- Cook, rest and sleep

6th day
- Check out AirBnb
- Visit Wanaka Lavendar Farm
- Visit Puzzling World 
- Have packed lunch
- Jones' fruit stall
- Grocery shopping at Queenstown
- Depart to Te Anau
- Check in AirBnb
- Cook, dinner, laundry, rest

7th day
- Breakfast at AirBnb
- Head to Milford Sound 
- Take Milford sound cruise
- Have packed lunch
- Sightseeing around 
- Head back to Te Anau
- Drop by Monkey Creek & Mirror Lake
- Arrive at same AirBnb
- Cook, dinner, rest

8th day
- Breakfast at AirBnb
- Head to Queenstown
- Walk around the town
- Shopping at DF souvenir
- Lunch at Fergsburger, snacks at CookieTime
- Check in AirBnb
- Take a drive up to the Remarkables for Queenstown view
- Walk along Lake Wakatipu
- Back to AirBnb, dinner, rest

9th day
- Breakfast at AirBnb
- Head to Queenstown airport
- Return car near ariport
- Flight to Auckland at 10.30am
- Arrive at Auckland airport. Pick up car. 
- Have packed lunch or lunch at Flame Gourmet Pizza & Burger
- Shopping at Dressmart
- Snacking at Snacks & Scoops
- Sightseeing
- Check in AirBnb
- Cook, rest

10th day
- Breakfast at AirBnb, final packing
- Visit SkyCity Auckland 
- Final shopping
- Sightseeing around Auckland city
- Lunch
- Drop off car @ airport
- Chilling at airport while waiting for flight @ 6.30pm
- Au revoir!

11th day
- Arrive at KLIA2 @ 3am

BUDGET

1) Flight 
- Air Asia Premium Flex               Rm 5444
- Air New Zealand (Domestic)      Rm 1160

2) Car rental
- North Island                             Rm 125
- South Island                             Rm 766

3) Accomodation
- North Island                             Rm 249
- South Island                             Rm 1638

4) Activity
- Wanaka Lavendar Farm            Rm 12
- Milford Sound                          Rm 306

5) Petrol                                    Rm 800

6) Food                                     Rm 1000
       
TOTAL = Rm 11,500

I will explain and describe further in the next post insyaAllah 😊

Till then.

xx

Friday 14 December 2018

New Zealand: Tips for baby-friendly trip

First oversea family trip, we made it!


Baba. Mama. Kawthar.

Alhamdulillah. 

I would say it was challenging yet fun. We chose to travel on our own (no tourist guide) and with a small child, we thought New Zealand is rather safe to be explored for the first oversea trip together. Here are the trip details:

Place: KL Malaysia - South & North Island NZ
Time: Early October
Season: Spring
Child's age: 15 months old
Airlines: Air Asia
Flight period: 12 hours

I don't think my preparation was perfect but I hope these tips can help parents out there to be well prepared. Because honestly, travelling with a small child (toddler some more) is just another level compared to travelling while single. When I was single, I could rest whenever I wanted to..😄

1) Bawa baby gear yang sesuai dan travel-friendly


 - Benda yang paling berguna sekali ialah baby carrier. Memang sang penyelamat di mana-mana. Bila di airport, bawa Kawthar dalam baby carrier je senang. Nak dukung guna tangan memang susahlah sebab bawa banyak beg. 

- Bawa stroller yang boleh lipat kecil dan ringan. Bukan besar gedabak. Jimat ruang dalam kereta sewa. 

- Carseat wajib pakai di NZ. Boleh kena saman 150 NZD kalau tak pakai. Boleh pilih samada nak bawa sendiri punya atau sewa di sana. Lebih kurang Rm 30/sehari. Kalau sewa on-the-spot, Rm 135/sehari. Varies accordingly. Kami bawa carseat sendiri. Gate check-in sekali dengan stroller. Percuma je. 

2) Pilih pakaian yang sesuai dengan cuaca


- Ketika kami di NZ, suhu masih lagi sejuk sampai ke tahap negatif darjah selsius. Waktu tu masih awal musim bunga. Mommy pilih baju dan seluar UNIQLO Heattech untuk pakaian lapisan dalam Kawthar. Baju ni bukan jenis inner biasa. Jenis simpan haba. Jadi, badan pun tak rasa sejuk sampai ke tulang!

- Mommy siapkan untuk Kawthar 4 jenis baju yang berbeza ketebalan; jaket luar, jumper/sweater, baju biasa dan inner Heattech. 

3) Bawa sunscreen, pelembap muka & losyen kanak2


- Cuaca yang sejuk dan kering seperti di NZ boleh menyebabkan kulit jadi sangat kering dan merekah sampai pedih. Kulit juga boleh jadi gatal-gatal sebab kering. Jadi sebelum keluar, mommy akan sapu sunscreen di bahagian badan yang terdedah. Pelembap muka di muka dan losyen di seluruh badan Kawthar. Pastikan pakai yang jenis kanak2 punya, bukan orang dewasa. Yes, it did work! 

4) Bawa ubat & peralatan 


- The last thing you want during travel is falling sick. Even more the children! Lagi-lagi bila kita pergi negara yang berbeza cuaca dengan negara kita. Gotta pay more attention.

- Peralatan seperti termometer, penyedut hingus dan syringe wajib bawa. 

- Ubat demam, ubat tahan sakit, Sterimar (nasal irrigator) dan selsema. Just basic ones.

5) Prepare travel play kit


- 12 hours flight is no joke for a toddler! They are busy humans, always need to move or do something. Mommy siapkan travel play kit yang ringan dan bawa 2 buku kesukaan Kawthar. 

- Kembara di NZ memerlukan kami duduk dalam kereta untuk tempoh masa yang lama. Jadi, play kit ni boleh main dalam kereta juga. Umpan untuk duduk elok2 dalam carseat 😅 Mommy seboleh mungkin tak nak bagi tablet atau handphone..jadi buat alternatif lain. 

6) Tempat duduk di dalam kapal terbang

- Tempat duduk AirAsia yang biasa tidak boleh recline, kecil dan mempunyai ruang kaki yang sempit. Budget airlines kan.. Untuk perjalanan yang singkat, mommy rasa ok lagi. Tapi untuk 12 jam, ia sangatlah tidak selesa untuk ibu/ayah pegang anak. Kelas pertama mahal sangat pula. 

- Jadi kami pilih Premium Flex Kelas Ekonomi. Mahal sikit tapi berbaloi. Ada basinet bayi (untuk 11kg ke bawah), kerusi boleh recline, dekat dengan toilet dan ruang kaki yang sangat luas. Kawthar siap main2 lagi kat lantai situ. Boleh jalan2 juga. 

7) Pilih penginapan yang mesra kanak2


- Kami pilih untuk menginap di AirBnb sepanjang 9 hari di sana (kecuali 1 malam di lodge). Caravan/Campervan agak kurang selesa untuk budak sekecil Kawthar kerana cuaca pada awal musim bunga masih sejuk (negatif di sesetengah tempat) dan tidur di dalam Campervan bukanlah pilihan yang sesuai. Walau bagaimana pun, campervan lagi jimat dari sudut kos. Hotel pula lagi mahal dari AirBnb. 

- Jenis AirBnb yang kami pilih adalah en-suite room. Ada private toilet. Boleh guna dapur (if possible). Periksa polisi AirBnb tu juga, pastikan ia terima budak berumur 0-2 tahun! Ada sesetengah tuan rumah tak suka budak bising nangis etc.

- Would you like to receive AirBnb discount of Rm120? Sign up through this link 👉 https://www.airbnb.com/c/ridwana231?currency=MYR

Yes, for real. Not a scam hehe. 

Paling penting, banyakkan doa moga Allah beri kekuatan untuk kembara bersama si kecil =) Till then. 

xx
MommyBel

Sunday 2 September 2018

My thoughts: Ergobaby Adapt carrier


Our first baby carrier was Ergobaby Adapt. It took me months and lots of googling and reading to finally decide that its the choice! 
Image may contain: 2 people, people smiling, people standing
Out and about with little Kawthar. I think
I should have adjusted her seat.
Price: Rm499 - Rm699
Availability: Lazada, Shopee, Little Whiz, Mothercare, Bebehause, Applecrumbyandfish

BEFORE: WHY I LIKED IT?


1) Can be used from newborn (at least weighing 3.2kg)

- Most SSC baby carriers are only for 4 months above. Do double check. Eventhough your baby exceeds recommended weight, do not use it if baby is not yet 4mo. Why 4mo? At that age, they have strong and consistent head and neck control and their backbones are stronger.

- I wanted to use a SSC baby carrier as soon as I can hence this is a WIN criteria! I didn't think wraps or ring sling would suit me. 

2) No infant insert needed

- Adapt is the only Ergo line that needs no insert. 

- Only by looking at it, I could sense that its tooooo warm for Malaysia! Kan??! I mean I don't plan to use it in malls or air conditioned places only.. Proven from many reviews that its quite warm. 

Image result for infant insert ergobaby
How to use an infant insert?
3) Grow with your baby!

- Can hold up to 20kg and it has bigger panel width and taller panel height compared to other versions of Ergo. 

- This means you can think of an upgrade at later time compared to others. Jimat!

4) Plain simple colour & pattern

- Unlike other Ergos, Adapt is only limited to solid colours like grey, black and blue with no patterns. 

- To me, senang nak match dengan baju! I like! 😆

5) Because its Ergo? 

- Most famous reputed brand worlwide. Senang terpengaruh betul 🙈

WHAT I LIKED AFTER USING ONE?

1) Great lumbar support

- Adapt has waistbelt that covers the lumbar part of backbones. This makes it tighten very well around waist. Tak banyak SSC yang ada feature ini. Selalunya SSC ada buckles je di tengah-tengah. 

- My husband's spine is a little curvy on lumbar area which can hurt sometimes. So, this lumbar support gave him comfort and he loves this feature so much!


Related image
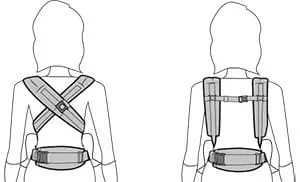
Straps can be criss-crossed for more snug - first for Ergo carrier!

2) Super easy to adjust when baby grows

- The seat width can be adjusted to 3 levels: A, B, C. As baby grows, their height increases so to ensure the seat support the leg accordingly, the width must increase. 

- When Kawthar first used it at around 1 month old, she started with level A. After few months, we noticed the seat width no longer support her legs in a KNEE-TO-KNEE position. Then, we adjusted the velcro to level B. No wonder the name is Adapt. this SSC is so adaptable 👍

Image result for adjustable seat width in ergobaby adapt

3) Attached hood & pocket

Image result for hood ergobaby adapt
Hoodie ON

- The hood is not detachable but when not in use, you can just tuck it away into the pocket. When in need, just snap onto the shoulder strap. We use it when we go out under the sun and I think hood is a must for a baby carrier. Baby can still peek out anyway.

- I'm a person who loves pockets. Buat baju kurung je mesti nak poket 😀 Sometimes, I just need to bring a handphone and money when going out with my baby so a pocket is all what I need. Very handy. I like! 

4) Cushioned and foldable head and neck support

- Untuk baby yang kecil, kepala dan tengkuk mereka masih belum kuat. Lembik. Masih belum boleh kawal dengan baik. Adapt ni ada macam kusyen di tengkuk untuk sokongan tambahan. 

- When Kawthar was a newborn, we folded the support inside to make it more comfy. As she grows up and there's little space inside, we folded it outside. Boleh juga tinggikan kusyen tu. Adjust pada butang. Easy as 1,2,3. 


Related image
When folded outside, lighter grey
WHAT I DIDN'T LIKE? 

Ergobaby Adapt is an innovative kind of SSC, its really good with lots of features that other SSC do not have. But I guess its true, everyone has a unique taste. Somehow, there are things I don't like too..😅

1) It's not simple

- Ironically, the innovative part makes it not as simple as other SSC. I took time to learn and adapt to it (ironi betul kan?!). This means when changing wearer (i.e.from my husband to me), it takes a little bit of time to do adjustments needed. My husband was more expert at adjusting it and it fit him well so I usually just let my husband use it cos I was too lazy to adjust. Haha. He loved this Ergobaby Adapt anwyay!

Image result for ergobaby adapt cartoon
3 ways: front, hip and back carry
2) Padded shoulder

- Some people find it cushy and comfy for their body. But I think because my body frame is quite petite, I felt it a little bit bulky for my shoulder. How did I realize that? After trying Jumpsac SSC! 😁 Later I learnt that one carrier may suit one's body more than another so it's good to rent first before getting one. 

At the end, I let go my Ergobaby Adapt. It was awesome but not meant for me. What made me decide to let it go? After I found Jumpsac baby SSC, local made carrier. 

I hope you will find THE ONE too!

Till then,
MommyBel
xxx

Toilet learning 20 months old

Potty trained at 20 months old?? One of the first reactions I received was:  "Pity her!" I do not blame anyone who thought...